How Wallpaper Remover Paste Makes Old Wallcovering Easier to Strip
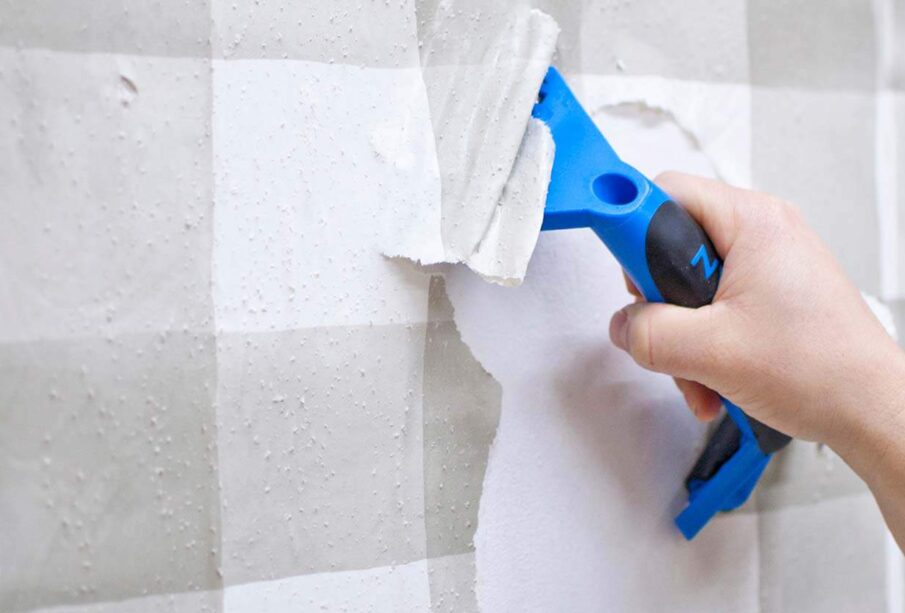
Old wallpaper often reveals its secrets one small section at a time
Wallpaper removal rarely begins with a dramatic pull that clears an entire wall. More often, one corner lifts while the rest stays firmly attached. The top layer may peel away, leaving paper backing and dried adhesive behind. Painted-over wallpaper can make the job even harder because moisture cannot easily reach the old paste. We created this guide for homeowners who want a calmer, more controlled way to uncover the wall beneath. The process can be improved by using wallpaper remover pastes designed to remain on the surface long enough to soften stubborn adhesive. Its thicker form can help reduce rapid runoff on vertical walls.
This guide explains testing, scoring, product application, scraping, and final wall cleaning. We will also show why patience often matters more than force. Different wallpapers respond in different ways. Some release their face layer first, while others need careful perforation before the remover can reach the adhesive. Drywall also requires gentler handling than plaster because aggressive scraping may tear its paper surface. The goal is not to finish the room in the fewest minutes. It is to remove the covering while leaving a stable wall ready for paint, primer, or new wallpaper. A small test area can reveal the right method before the full wall becomes wet.
What should you learn from a small wallpaper test area
Choose a low, less visible section before treating the entire room. Try lifting a seam with a suitable scraper. Notice whether the wallpaper comes away in one piece or separates into layers. Check the wall beneath for paint, primer, bare drywall, or plaster. These details affect how much moisture and pressure the surface can tolerate. A test also shows how long the remover needs to work.
Use the sample area to check
- Whether the decorative face peels away dry
- How deeply the old adhesive has bonded
- Whether scoring helps the product enter
- How the wall reacts to moisture
- Which scraper angle causes the least damage
Do not rush because the first strip refuses to move. Apply the remover according to its label and wait for the stated time. Test the edge again before adding more force. If the paper releases more easily, repeat that method across manageable sections. One careful trial can prevent hours of unnecessary scraping.
How can paste remover stay effective on a vertical wall
A thick remover is useful only when applied evenly and left to work. Prepare the room before opening the container. Protect floors, trim, outlets, and nearby furniture. Switch off electrical power where wet work may reach fixtures, following safe procedures. Remove loose wallpaper faces when possible. Score coated surfaces only as directed and avoid cutting deeply into the wall.
Apply enough product to keep the section wet, but do not overload the surface. Work in areas small enough to strip before the remover dries. Covering a treated section with approved plastic film may help retain moisture when the product directions allow it. Check the wallpaper after the recommended dwell time has passed. A properly softened layer should release with less pressure.
Keep the work controlled with
- Even coverage from top to bottom
- Manageable sections rather than a full room
- Enough waiting time for adhesive softening
- Added product where dry patches appear
- Good ventilation throughout the project
Why should scraping begin gently and increase only when needed
The wall beneath the paper is more important than the speed of removal. A sharp tool held at the wrong angle can gouge plaster or tear drywall.
- Start at a softened seam
Lift the paper where the remover has already entered. Pull slowly while keeping the strip close to the wall. This reduces sudden tearing.
- Hold the scraper at a low angle
A flatter angle helps the blade move beneath the paper instead of into the wall. Use steady pressure rather than quick jabs. Stop when the surface begins to mark.
- Reapply remover to resistant areas
Stubborn patches usually need more moisture or time. Do not attack them with greater force immediately. A second application may release them cleanly.
- Remove leftover paste before it dries again
Old adhesive can remain after the paper is gone. Soften and wipe it using the approved method. Change dirty water and cloths often to avoid spreading residue.
What final checks prepare the bare wall for its next finish
A stripped wall may look clean while still holding a thin layer of adhesive. Run a damp hand over a small area after it dries. A slick or tacky feel may show that residue remains. Wash the wall using the method recommended for the remover and surface. Avoid soaking drywall. Let the room dry fully before making repairs.
Complete these final checks
- Inspect the wall under strong side lighting
- Remove remaining adhesive and paper fibers
- Repair small holes or damaged areas
- Sand only after the wall is fully dry
- Prime the surface before the next finish when required
Do not paint over damp patches or soft drywall paper. Drying time can vary with temperature, airflow, and wall condition. A clean, firm surface gives the next finish a far better start.
Leave the wall cleaner than the shortcut would have allowed
Wallpaper removal is less about pulling hard and more about helping old adhesive release. We should test first, protect the room, apply remover evenly, and give it time to work. Gentle scraping can preserve the wall while careful washing clears the final residue. Follow the product label for preparation, ventilation, application, and cleanup. Once the surface is dry, inspect it without rushing toward the next step. Let the newly uncovered wall rest for a moment, then begin its next chapter on a foundation you prepared with care.